Add Pixies to Your Reports
The Add Pixies page is where you connect to Power BI, select reports, and add tracking Pixies to them. This guide also covers Update Pixies and Remove Pixies, which you can invoke from the Managed Reports page after Pixies have been added to your reports.
Choosing Which Reports to Track
First time using BI Pixie? Start with a report that is not in production. This lets you explore how the Pixies work and confirm that events are being captured before tracking your live reports.
Already familiar with BI Pixie? Add Pixies in your pre-production workspace before promoting reports to production. If you use Power BI Deployment Pipelines or separate workspaces for dev/test/prod, add Pixies in the test stage and then deploy to production. If you don't use deployment pipelines and your reports are already in production, you can add Pixies directly to the production workspace.
Always keep a backup. Before adding Pixies, make sure you have a copy of your report so you can revert if needed. In emergencies, you can always remove the Pixies even without a backup — the Remove Pixies action is available from the Managed Reports page.
For mission-critical reports, you can use the Download method to preview the changes to your reports before saving to your workspace.
Step 1: Connect to Power BI
- In the BI Pixie portal, navigate to the Add Pixies page. You can get there from Managed Reports or the Overview checklist.
- Click the Connect to Power BI button.
- A Microsoft sign-in popup will appear. Sign in and grant BI Pixie the required permissions to access your Power BI workspaces. See Fabric API Permissions below for details.
- Once connected, you will see the workspace picker.
Tip: Before connecting, you can expand the explanation section to learn how the process works. It explains that Pixies are invisible and do not affect report performance, and that BI Pixie Cloud is a fully managed service with no infrastructure to deploy.
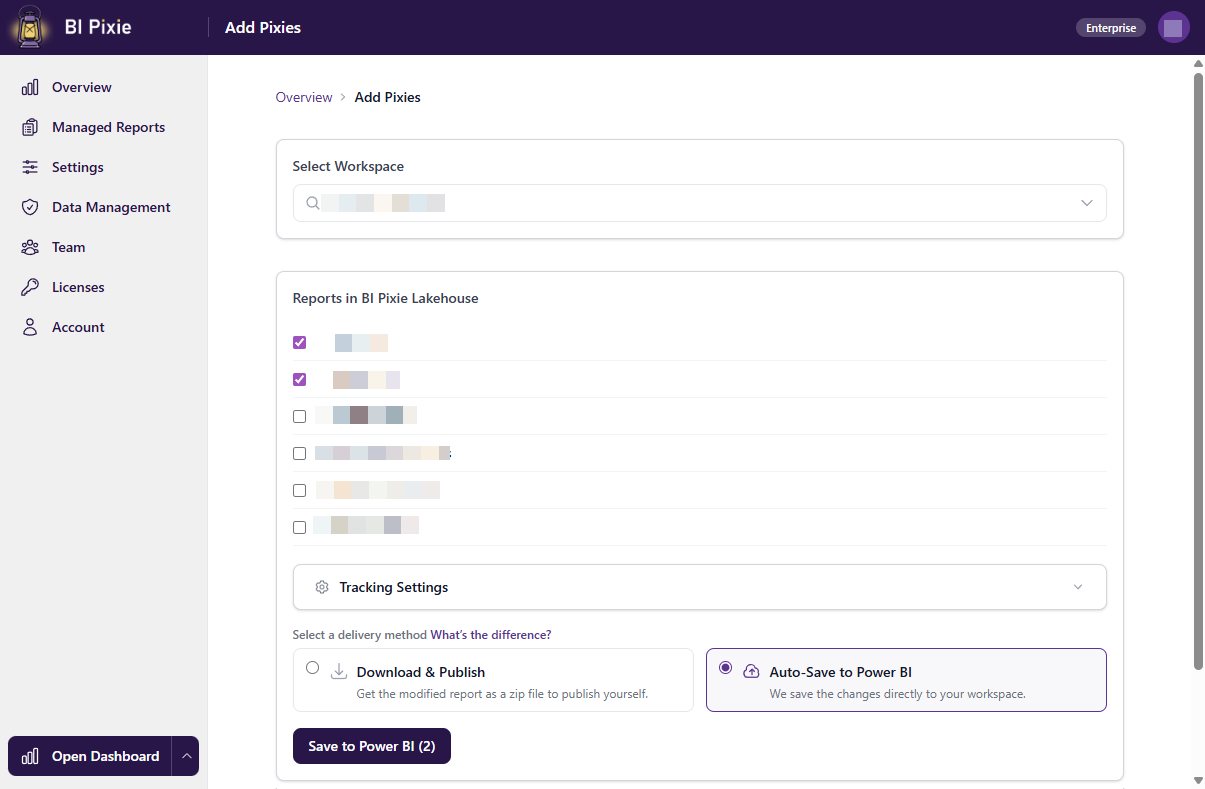
Step 2: Select a Workspace
- Use the Select Workspace dropdown to search for the Power BI workspace where you have the report that you would like to track.
- Type in the search box to filter workspaces by name.
- Click a workspace to select it. The portal will load the reports in that workspace. Only workspaces where you have Contributor, Member, or Admin role will appear in the list.
Step 3: Choose an Action
The action is automatically determined based on the reports you select. When you select reports without Pixies, the action is Add Pixies. When you select reports that already have Pixies, the action switches to Update Pixies.
| Action | Purpose |
|---|---|
| Add Pixies | Add tracking Pixies to reports that do not yet have them. This is the default action. |
| Update Pixies | Refresh Pixies on reports that already have them. Use this after you change report layouts or tracking settings. |
To remove Pixies from a report, use the Remove Pixies action from the Managed Reports page.
Step 4: Select Reports
- Use the checkboxes to select the reports you want to track.
- Each report shows its current status (whether Pixies have been added or not).
- A counter at the bottom shows how many of your plan's report slots are in use (e.g., "3 of 5 reports").
Note: If your plan's report limit is reached, you will see a message indicating the plan is fully used. Admins can click "Upgrade for more" to view available plans.
Step 5: Choose a Delivery Method
Choose how the updated reports are delivered:
| Method | How It Works |
|---|---|
| Auto-Save to Power BI | BI Pixie writes the reports with Pixies directly back to your Power BI workspace. This is the simplest option. Your reports are updated in place. |
| Download & Publish | BI Pixie prepares the report files with Pixies for download. You then publish them manually to your workspace. This gives you full control over when and where the changes appear. |
You can expand "What's the difference?" to see a side-by-side comparison of both methods.
Dedicated Tracking Keys Enterprise
Enterprise accounts can enable per-report tracking keys from the Account page. When enabled, a checkbox labeled "Use a dedicated tracking key for this report" appears in the confirmation dialog before adding or updating Pixies. Each report gets its own tracking key, so if one key is rotated, the others keep working. You can rotate individual report keys from the Managed Reports action menu.
Step 6: Add Pixies
- After selecting your reports and delivery method, click the action button (e.g., Add Pixies or Update Pixies).
- A progress bar will appear showing the progress for each report.
- A real-time log shows details about each step (loading definitions, scanning, adding Pixies, saving).
- When the process completes, go to the Managed Reports page to see your newly tracked reports.
If you chose the Download & Publish method, a download panel will appear with instructions on how to publish the files to your workspace.
Tracking Settings
Before adding Pixies, the page shows a Tracking Settings card that displays the effective tracking settings for the selected workspace and reports. These settings come from the Settings page. If you want to change what gets tracked (e.g., enable feedback or surveys), configure those settings first.
How It Works
When you add Pixies, BI Pixie performs these steps:
- Load definitions: BI Pixie reads the definitions of your selected reports and semantic models from your Power BI workspace. Only the structural definitions are read — BI Pixie never reads the data in your semantic model and cannot import it.
- Scan and analyze: BI Pixie scans the definition of the selected report, pages, and visuals to identify hyperlinks, filters, slicers, bookmarks, tooltips, and drill-through configurations. If a semantic model with the same name exists in the same workspace, BI Pixie also reads its definition to get broader context for features like link click tracking and RLS auditing.
- Add Pixies: BI Pixie adds invisible Pixies (tiny native Power BI table visuals and hidden measures) to your reports. If feedback controls or surveys are enabled and a semantic model with the same name exists in the same workspace, BI Pixie also adds helper tables to the semantic model to support these features.
- Save: BI Pixie writes the updated definitions back to your workspace (Auto-Save) or prepares them for download.
What the Pixies Look Like
The Pixies are designed to be invisible to your report consumers while remaining organized and auditable for your BI team:
- Table visuals — Tiny (1x1 pixel) table visuals placed in one corner of each report page, grouped together under a
{ BI Pixie }group in the Selection pane. - Hidden measures — Dynamic measures added at the report level, grouped in a
{ BI Pixie }folder and marked as hidden.
To inspect the Pixies in Power BI Desktop:
- Open a report with Pixies in Power BI Desktop.
- Select the View tab and open the Selection pane.
- Find and expand the { BI Pixie } group at the bottom of the pane to see the Pixie visuals.
- In the Data pane, click the ellipsis on any table and select View hidden. Then search for "pixie" in the measures search box to find the table where all the hidden measures are stored. They will be grouped under a
{ BI Pixie }folder.
Update Pixies
Every time you update Pixies on a report, BI Pixie will:
- Remove all previous Pixies from the report.
- Re-scan the report definitions to detect any changes (new pages, visuals, slicers, etc.).
- Add fresh Pixies based on the current report definitions and your latest tracking settings.
You should update Pixies after any change to the report definition that goes to production, or when you change tracking settings. This includes adding or removing pages, visuals, slicers, bookmarks, or drill-through links. If visual-level tracking is enabled, even moving or resizing a visual requires an update so the heatmap positions stay accurate. You do not need to update Pixies after a data refresh — refreshes only update the data, not the report definition.
Note: Updating Pixies is not automatic. When a report definition changes, you will need to go to Managed Reports, open the action menu for the report that has changed, and select Update Pixies. If you would like to automate this process, contact us to discuss automation options.
Using Deployment Pipelines
If you use Power BI Deployment Pipelines, we recommend this workflow:
- Keep your original reports in the Development stage.
- Deploy to the Test stage using the Deployment Pipeline.
- Connect BI Pixie to the Test workspace and add Pixies there.
- Verify the tracked reports in the Test workspace.
- Deploy the tracked reports from Test to Production using the Deployment Pipeline.
Expired Plan
If your plan has expired, adding and updating Pixies is not available. During the grace period, you can still use the Remove Pixies action to clean Pixies from your reports. Admins will see a "Renew your plan" button to restore access. After the grace period ends, access is suspended and your telemetry data is deleted in accordance with our Privacy Policy.
Fabric API Permissions
When you connect to Power BI, BI Pixie requests the following Microsoft Fabric API permissions through a standard OAuth consent flow:
| Permission | Why it's needed |
|---|---|
Workspace.Read.All | List your Power BI workspaces so you can select which one to work with. |
Report.ReadWrite.All | Read report definitions to scan pages and visuals, and write updated definitions with Pixies back to your workspace. |
SemanticModel.ReadWrite.All | Read semantic model definitions for broader context (e.g., link click tracking and RLS auditing). When feedback controls or surveys are enabled, BI Pixie adds helper tables to the semantic model — only if it is in the same workspace and shares the same name as the report. |
These are delegated permissions — BI Pixie acts on your behalf and can only access workspaces where you have Contributor, Member, or Admin role. If your organization requires admin consent for API permissions, your Microsoft Entra ID administrator will need to approve the request before you can connect. See the Getting Started guide for troubleshooting blocked sign-ins.
What's Next
- Managed Reports: View and manage your tracked reports, and use the Event Viewer to verify events are being collected.
- Settings: Customize your tracking settings before adding or updating Pixies.
- Collect User Feedback: Add feedback controls to your reports.