Managed Reports
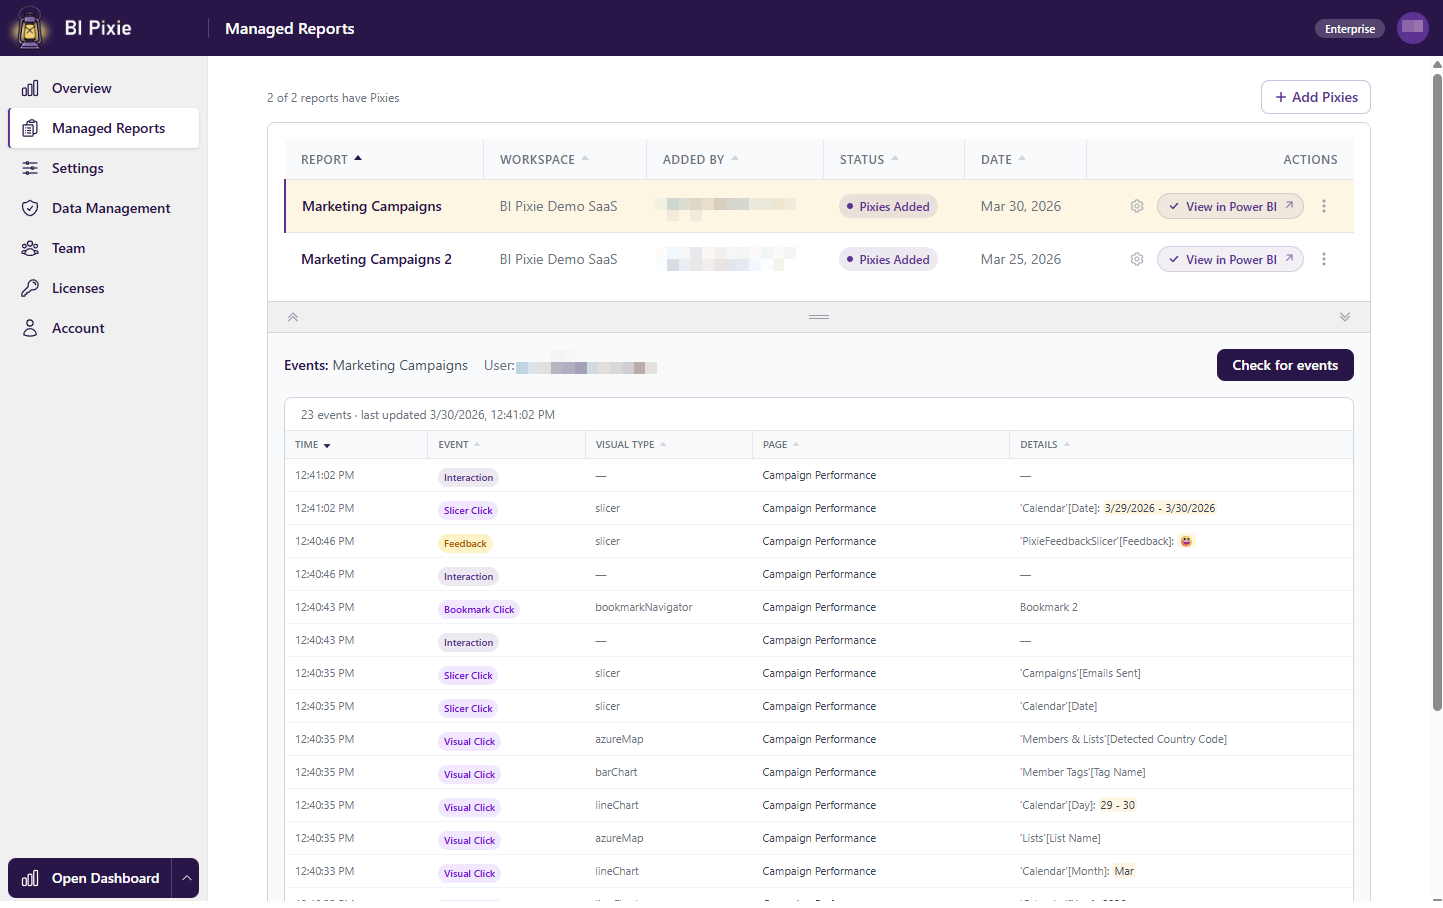
The Managed Reports page is your central hub for viewing and managing all Power BI reports tracked with Pixies. From here you can see which reports are being tracked, view recent events, and perform management actions like updating Pixies, rotating keys, and releasing report slots.
Page Layout
The page uses a two-pane split layout:
- Top pane (Reports Table) — A sortable table listing all your managed reports.
- Bottom pane (Event Viewer) — Shows recent events for the selected report.
Reports Table
The Reports Table is where you manage all the reports that are tracked with Pixies. From here you can see each report's status, who added the Pixies, and take actions like updating, removing, or releasing reports. The table shows the following columns:
| Column | Description |
|---|---|
| Report | The report name. |
| Workspace | The Power BI workspace containing the report. |
| Added By | The email address of the user who added Pixies to the report (Admin only). |
| Status | Shows "Pixies Added" or "Pixies Removed". |
| Date | When Pixies were added or removed. |
| Actions | Settings icon, View in Power BI link, and action menu (three-dot icon). |
All columns are sortable. Select a report row to load its events in the Event Viewer below.
Report Actions
Each report row has three action elements:
Settings Icon (Gear)
Opens the Settings page pre-filtered for that specific report, so you can view or edit its tracking configuration.
View in Power BI (External Link Icon)
Opens the report directly in Power BI Service in a new browser tab.
Action Menu (Three-Dot Icon)
A dropdown menu with the following options:
| Action | What It Does |
|---|---|
| Update Pixies | When you make changes to your report, this is where you update the Pixies to ensure that your tracking data stays accurate. Navigates to the Update Pixies page with this report pre-selected for updating. We recommend updating Pixies after any change to the report definition. See What happens if I don't update the Pixies? for details. |
| Rotate Key | Generates a new dedicated tracking key for this report. Only available when per-report keys are enabled (Enterprise/Trial). After rotating, you must update Pixies on the report so it uses the new key. See Account Security for more details on tracking keys. |
| Remove Pixies | Removes all Pixie tracking elements from the report and restores it to its original state. Navigates to the Remove Pixies page with this report pre-selected for removal of the Pixies. This action is only available when the report status is "Pixies Added". See Remove Pixies below for more details. |
| Delete all events | Permanently deletes all collected event data for this report. The report remains tracked and continues collecting new events. This action cannot be undone. |
| Release report slot | Need to track a different report without exceeding your plan's report limit? Release a report slot to remove the report from tracking and delete its collected events, freeing up the slot so you can track another report in its place. You can see how many releases are remaining in the Plan Usage section on the Overview page. |
Event Viewer
After adding Pixies to a report, use the Event Viewer to verify that the Pixies are working and capturing events. Open the report in Power BI, interact with it, then check back here to confirm events are flowing. The bottom pane shows the most recent events for the selected report. To use it:
- Click a report row in the table above to select it.
- The Event Viewer header shows "Events: [Report Name]" and a "How it works" guide.
- Click the Check for events button.
- BI Pixie fetches the 20 most recent events for that report and displays them in a table.
The event table columns are:
| Column | Description |
|---|---|
| Time | When the event occurred. |
| Event | The type of interaction, shown as a color-coded pill (Page View, Visual Click, Interaction, Filter, Slicer Click, Tooltip View, Bookmark Click, Drillthru, Link Click, Feedback, etc.). |
| Visual Type | The type of visual involved in the interaction. |
| Page | The report page where the event occurred. |
| Details | Additional context such as filter values (highlighted in gold), bookmark names, or clicked URLs. |
Column widths can be resized by dragging the column borders. All columns are sortable by clicking their headers.
If the events include a username, it is displayed in the Event Viewer header.
Remove Pixies
To remove Pixies from a report, open the action menu (three-dot icon) on the report row and select Remove Pixies. This navigates to the Remove Pixies page with the report pre-selected for removal.
When you remove Pixies, BI Pixie reads the report and semantic model definitions, strips all Pixie tracking elements (visuals and hidden measures), and writes the clean definitions back to your workspace. Your report is restored to its original state before Pixies were added.
After removal, the report's status changes to "Pixies Removed" in the Managed Reports table. The report remains listed so you can still view its previously collected events or release the report slot. No new events will be collected.
Note: Remove Pixies is only available when the report status is "Pixies Added". If your plan has expired, you can still remove Pixies during the 7-day grace period. After the grace period ends, access to the portal is suspended.
What's Next
- Settings: Change tracking settings for specific reports.
- Set up BI Pixie Dashboard: Install the Power BI template app for full analytics.